
Restroom Cleaning Procedures
A clean, well-maintained restroom (or "comfort room" as it may be referred to outside of the U.S.) promotes good health and hygiene and reduces the spread of infection and disease.
It is essential that janitorial staffs follow consistent restroom cleaning procedures. Not only does this prevent cross contamination, but it also improves efficiency and reduces overall labor time.
Section 1: Safety Precautions
Before beginning with any cleaning task, be sure that you fully understand how to use the chemicals and equipment required for the job. It is mandated by OSHA that every employee has a right to know about the possible chemical hazards within their workplace.
A safety data sheet (SDS) will provide the information regarding the chemicals within your building. Read and understand the SDS, as well as the product label for every product that you use. Your supervisor will show you where to find your SDS information and will also help you read and understand each sheet. The SDS for every product Jon-Don sells can be found online at www.jondon.com or you can call one of our representatives to have a copy sent to you (call us at 800-400-9473).
Be careful not to use cleaning chemicals on any surface for which they are not intended. Be especially cautious when using acid cleaners. Never mix chemicals. It could cause serious or even fatal injury.
Wear the proper personal protective equipment (PPE) to protect yourself from exposure to cleaning chemicals. Gloves, a mask and goggles will prevent chemical splashes from coming into contact with your skin and eyes.
Practice universal precautions when cleaning any blood or body fluid spills, or soiled materials that could contain these or other potentially infectious substances.
Note: Refer to OSHA’s bloodborne pathogen standards for more information. Quick Reference Guide to the Bloodborne Pathogens Standard
Section 2: Preparation
When preparing for restroom cleaning, first review the supply checklist then begin to set up the cart with all supplies that will be needed, such as: soap and paper dispenser refills, cloths, bowl mops and other proper cleaning equipment.
Load the cart with all the properly labeled cleaners that will be needed. Be sure that the correct dilution rates are used according to the manufacturer’s recommendations. A chemical management system ensures that dilution rates are correct and makes your job faster and easier.
Display the proper caution signs to warn of wet floors and close the restrooms to patrons before beginning to clean.
Section 3: Daily Cleaning Procedures
Remember these three rules of restroom cleaning:
Rule #1:Always clean top to bottom.
Rule #2: Clean from dry to wet.
Rule #3: Work towards the exit door.
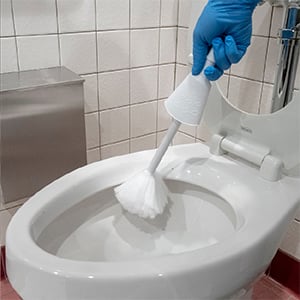
Cleaning Toilets and Urinals Part 1
As you know, toilets and urinals can be tough and unpleasant to clean. By applying the proper disinfectant to the bowls ahead of time, your job will be less troublesome with cleaner results.
- First, flush each unit. This is done to ensure that the unit is free of contamination and determine if it’s working properly. Report any damage or malfunctioning units to your supervisor or maintenance department.
- It is good practice to back-flush commodes before cleaning. Do this by inserting the bowl mop several times into the bowl throat, forcing the water up and over the bowl trap. This eliminates the water in the bowl, allowing more of the surface to be cleaned and less dilution of the cleaner.
- For urinals, remove debris with your gloves on and place the urinal screen on a paper towel while you clean.
- Apply a disinfectant solution, such as AF79 or Quat-Stat, to the interior and exterior surfaces of all urinals and toilets.
- Let it stand and move on to “dry cleaning.”
Toilet Cleaners
High Dusting
Practicing the “top to bottom” rule, begin by using a long handled high duster to remove dust from ceiling corners, wall vents, tops of partitions, door frames, window sills, light fixtures and other high areas that may gather dust. This can be done once or twice a week.
High Dusting Tools
Trash Removal
Empty all trash receptacles and disposal units for sanitary napkins. Remove the contents and replace the liners. Never compress the trash and always be careful of sharp objects that may be sticking out of the liners. Spray the receptacles with disinfectant spray such as Betco Glybet II.
Dispensers:
Soap Dispensers
- Check the soap dispenser and refill when necessary. Betco’s Winning Hands Antibacterial Hand Cleaner is one of the many hand cleaners available in the Jon-Don product line.
- Follow the manufacturer’s instructions for opening, filling and securing each type of soap dispensing unit.
- Clean the exterior of the soap dispensers with a damp cloth and a disinfectant solution. If necessary, remove any buildup around the delivery area. Allow it to air dry.
Paper Towel Dispensers
- Unlock the dispenser and refill the paper towels. When opening, be careful not to let the fall open; it could cause injury and a mess.
- Replace and add more towels as needed to fill the unit. For tri-fold towels, be sure to place them folded-side down and to interlock the new towels with the old. Try not to overfill the dispenser because it makes the towels difficult to pull out. Check to make sure they release easily.
- Close and lock the dispenser making sure it is secure.
- Damp wipe the outside of the towel dispenser or the hand dryer with a disinfectant solution and allow it to air dry.
Toilet Tissue Dispensers
- Unlock the dispensers for the toilet tissue holders. Remove the roll and damp wipe the inside of the holder to remove any paper dust using a disinfectant solution. Allow it to air dry.
- Install a new roll of tissue. Be sure the roll unwinds over the top of the roll and not from underneath. This allows it to be pulled out more easily and avoids unrolling and wasting of the product.
- Close and re-lock the dispenser. Damp wipe the outside of the dispenser with disinfectant solution.
Restock any other dispensing units in the restroom such as tampons or toilet seat covers. Damp wipe the units with disinfectant solution. Report any equipment, including dispensers that look damaged or do not work properly, to your supervisor.
Dry Floor Care
Dust mop the floor starting at the farthest corner and working towards the door. Collect the dirt with a dustpan and place it in the proper trash receptacle.
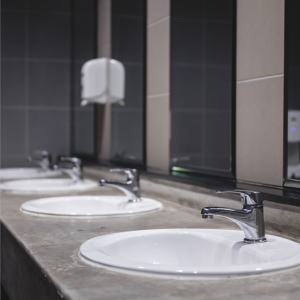
Sinks and Countertops
Clean sinks by first using a paper towel to remove any hair or debris. Spray disinfectant inside of the sink and exterior surfaces including all metal handles, faucets and the plumbing until covered. Allow the product to stand for at least 10 minutes for proper disinfection. Wipe using a clean cloth or sponge.
Mirrors and Glass Surfaces
Clean mirrors and glass surfaces. Spray glass cleaner, such as Betco’s Deep Blue, from the bottom to the top. Using a clean cloth, wipe the surface from the top to the bottom to prevent streaking.
Note: Be careful how you use your damp cloths or sponges. Avoid using the same cloth for cleaning the toilet, the mirrors and the sink. This reduces the risk or cross-contamination.
Spot Cleaning
Spot clean with disinfectant solution to remove any stains and dirt from walls and switches. Make sure to spray the cleaner on the cloth or sponge when cleaning light switches or fixtures.
Cleaning Toilets and Urinals Part 2:
Now that the disinfectant has had ample contact time, you can continue cleaning the toilets and urinals.
- Clean the inside of the toilet with the bowl mop paying close attention to the underside of the flush rim. This prevents the accumulation of bacteria that can spread disease and create unpleasant odors.
- Flush toilet to rinse the bowl. Use the clean water to rinse your bowl mop.
- Flush toilet again.
- Wipe down the exterior surfaces of the fixture with a clean cloth.
- Damp wipe all the flush handles and all other chrome. Allow the disinfectant to air dry.
- Use an acid bowl cleaner such as Betco Stix to de-scale the flush rim once a week. Remove water by back-flushing with a bowl mop. Saturate the mop with the cleaner and wet all surfaces thoroughly. Rinse by flushing. Only use the acid bowl cleaner on the interior of the bowl and NEVER on the seat. Acid residue could cause harm to skin.
- For urinals, use a bowl mop and wash the pre-sprayed disinfectant from the top to the bottom.
- Replace the urinal screens.
Tubs and Showers
- When cleaning tubs and showers, first remove all gross soils.
- Apply a tub and shower disinfectant such as Betco’s Sure Bet to the walls and floors of a tiled shower stall. Be sure to read the label for dilution recommendations. Thoroughly wet all surfaces including the door tracks, doors, walls, soap dish, faucets and showerhead.
- Allow approximately ten minutes of contact time. Wipe with a nonabrasive scrub pad or sponge.
- Rinse thoroughly.
- Always use a nonacid disinfectant on fixtures. Acid disinfectants are highly corrosive. Follow manufacturer’s recommendations for fiberglass showers.
- Dry all surfaces carefully to prevent slips and falls.
Final Spot Cleaning
Do final spot cleaning on the places that are most often touched in a restroom. Spray Glybet II on the handles of urinals, toilet seats, doors and towel dispensers as a final precaution to reduce cross-contamination.
Wet Mopping
- Wet mop the floor with a disinfectant solution such as AF315 or Quat-Stat starting from the farthest corner of the room working toward the exit door. Go along the baseboards first to keep them from getting splashed.
- Apply the solution from the mop bucket moderately with special attention given to toilet areas, urinals and sinks.
- Be sure to change the solution once it becomes visibly diluted or contaminated with soil; or at the very least after every three restrooms regardless of visible contamination.
Section 4: Detail Cleaning Procedures
Special cleaning requires detail procedures. Certain things like cleaning stains from the grout need to be done approximately once per month. Others, like cleaning ceilings and walls, are done approximately once per year.
Detail Cleaning Tasks:
- To clean higher fixtures such as lights or vents, wipe them down with a neutral cleaner such as Unitex Daily Clean Neutral Cleaner.
- Spray and wipe the insides of trash and sanitary napkin receptacles with disinfectant when they become visibly soiled.
- Remove any graffiti with a product specifically designed for graffiti removal. Be sure to read the label before using the product.
- Cleaning grout on tile floors needs to be done periodically and requires special equipment. Scrub the grout using a grout-scrubbing machine.
- If you notice odor coming from restroom or shower drains, use an enzymatic drain maintainer (Betco Push). Use the product a minimum of three times a week to maintain drains.
Section 5: Cleanup Procedures for your Equipment
- When finished with all necessary procedures and all surfaces are dry, remove posted signs.
- Wash all equipment thoroughly.
- Properly discard mop bucket solutions when cleaning is complete at the end of the day.
- Hang mops to dry.
Section 6: Summary
1. Be sure to practice good safety precautions:
- Understand product labels and SDS information.
- Wear the proper personal protective equipment (PPE).
- Follow OSHA’s bloodborne pathogen standards with regard to blood and bodily fluid cleanup.
- Post caution signs before cleaning.
2. Review your supply checklist and stock your cart.
3. Know your daily procedures and the routine in which to perform them.
4. Remember these there rules when cleaning and disinfecting a restroom:
- Always clean top to bottom.
- Clean from dry to wet.
- Work towards the exit door.
5. Know your detail and periodic cleaning procedures and when to perform them.
6. Be sure to always clean up and wash your equipment at the end of your shift or at the end of a workday.
7. Report any damaged or non-functioning dispensers, fixtures or equipment to proper personnel.

Call us for product recommendations and free expert advice 1-800-400-9473!
A clean, well-maintained restroom promotes health and hygiene and reduces the spread of infection and disease.
It is essential that janitorial staffs follow consistent restroom cleaning procedures. Not only does this prevent cross contamination, but it also improves efficiency and reduces overall labor time.
Before beginning with any cleaning task, be sure that you fully understand how to use the chemicals and equipment required for the job. It is mandated by OSHA that every employee has a right to know about the possible chemical hazards within their workplace.
A safety data sheet (SDS) will provide the information regarding the chemicals within your building. Read and understand the SDS, as well as the product label for every product that you use. Your supervisor will show you where to find your SDS information and will also help you read and understand each sheet. The SDS for every product Jon-Don sells can be found online at www.jondon.com or you can call one of our representatives to have a copy sent to you (call us at 800-400-9473).
Be careful not to use cleaning chemicals on any surface for which they are not intended. Be especially cautious when using acid cleaners. Never mix chemicals. It could cause serious or even fatal injury.
Wear the proper personal protective equipment (PPE) to protect yourself from exposure to cleaning chemicals. Gloves, a mask and goggles will prevent chemical splashes from coming into contact with your skin and eyes.
Practice universal precautions when cleaning any blood or body fluid spills, or soiled materials that could contain these or other potentially infectious substances.
Note: Refer to OSHA’s bloodborne pathogen standards for more information. Quick Reference Guide to the Bloodborne Pathogens Standard
SHOP SAFETY SUPPLIES
When preparing for restroom cleaning, first review the supply checklist then begin to set up the cart with all supplies that will be needed, such as: soap and paper dispenser refills, cloths, bowl mops and other proper cleaning equipment.
Load the cart with all the properly labeled cleaners that will be needed. Be sure that the correct dilution rates are used according to the manufacturer’s recommendations. A chemical management system ensures that dilution rates are correct and makes your job faster and easier.
Display the proper caution signs to warn of wet floors and close the restrooms to patrons before beginning to clean.
|
Remember these three rules of restroom cleaning:
|
Cleaning Toilets and Urinals - Part 1
As you know, toilets and urinals can be tough and unpleasant to clean. By applying the proper disinfectant to the bowls ahead of time, your job will be less troublesome with cleaner results.
- First, flush each unit. This is done to ensure that the unit is free of contamination and determine if it’s working properly. Report any damage or malfunctioning units to your supervisor or maintenance department.
- It is good practice to back-flush commodes before cleaning. Do this by inserting the bowl mop several times into the bowl throat, forcing the water up and over the bowl trap. This eliminates the water in the bowl, allowing more of the surface to be cleaned and less dilution of the cleaner.
- For urinals, remove debris with your gloves on and place the urinal screen on a paper towel while you clean.
- Apply a disinfectant solution, such as AF79 or Quat-Stat, to the interior and exterior surfaces of all urinals and toilets.
- Let it stand and move on to “dry cleaning.”
High Dusting
Practicing the “top to bottom” rule, begin by using a long handled high duster to remove dust from ceiling corners, wall vents, tops of partitions, door frames, window sills, light fixtures and other high areas that may gather dust. This can be done once or twice a week.
Trash Removal
Empty all trash receptacles and disposal units for sanitary napkins. Remove the contents and replace the liners. Never compress the trash and always be careful of sharp objects that may be sticking out of the liners. Spray the receptacles with disinfectant spray such as Betco Glybet II.
SHOP DUSTING & TRASH SUPPLIES
Soap Dispensers
- Check the soap dispenser and refill when necessary. Unitex Bulk Touch-Free Dispensers are an excellent option for most facilities.
- Follow the manufacturer’s instructions for opening, filling and securing each type of soap dispensing unit.
- Clean the exterior of the soap dispensers with a damp cloth and a disinfectant solution. If necessary, remove any buildup around the delivery area. Allow it to air dry.
We pay the shipping charge, including hazardous material fees, on this item. There's no catch. No "buy this to get that" requirement.
Note: If your order contains items that are not eligible for free shipping, your order total will include our competitive shipping rates for those non-eligible items only. This shipping policy only applies to orders shipped within the Contiguous U.S.
